5 Adobe Illustrator Tips and Tricks
By Erin Neisewander - eGuide Digital Manager
Maybe you are just starting out or maybe you have been using Adobe Illustrator for 20 years like I have. No joke, I still learn something new everyday! In this blog we are going to touch on 5 things we think everyone from novice to expert should know when using this program.
Tip 1: Keyboard shortcuts
Let’s pause for the importance of Keyboard shortcuts…I’m not overreacting at all here when I say they are LIFE CHANGERS. I’ve been using them so long that I see my keyboard as a sort of piano if you will, it’s my instrument in which to create and those keyboard shortcuts cut my time in half.
Adobe has a really great list of Mac and Windows-based shortcuts that will get you tickling those keyboard ivory’s (pun intended).
Check out some defaults here: https://helpx.adobe.com/illustrator/using/default-keyboard-shortcuts.html
Tip 2: Shapes, Modes, and Pathfinder
The shape, modes, and pathfinders in Illustrator will help you not only make more complex shapes faster, but it also comes in really handy when getting things ready for print.
Introducing your Shape Modes:
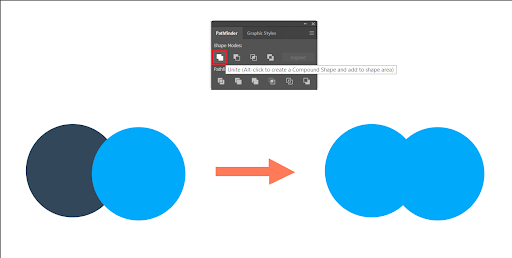
Unite - You guessed it, this unites multiple shapes or objects into one shape.
Unite
Minus Front - This lets you divide the object that is in the back from the object that is in the front. Think of making a moon shape: you put two circles half over the other and hit Minus Front and BOOM! You’ve got a crescent moon.
Minus Front
Intersect - This traces the outline of the region that is overlapped by all of the objects which essentially creates a new shape from what is left over.
Intersect
Exclude - The same as intersect but the exact opposite, it allows you to exclude the overlapped area of the two shapes.
Exclude
Tip 3: Separations Preview
This is one that they don’t teach you in school. Why? Separations Preview is used mostly in proofing and printing. BUT, it is a HUGE help for making sure your files are in the best shape before you send them to print. This will save you a lot of back-and-forth time and sometimes even money.
Turning on Separations Preview is as follows:
Go to the top of your Adobe Illustrator and click Window, and a drop down will open up. Click on Separations Preview towards the bottom and there you have it!
You can certainly use this with CMYK colors only, but the magic truly happens when you are using spot colors (Pantone colors) in your workspace. You can toggle the eye on and off to make sure each piece of your art is set to the correct color, ensuring a smoother transition into printing!
Tip 4: Align
This one is a biggie for me! I like to make sure things are lined up exactly and that they always look their best. Being one tiny point off can be really noticeable.
You will find this handy tool at the top of your illustrator artboard area.
Using this one is pretty self-explanatory, select the items you want to align and pick any of these align tools you want to use. Left align, Center Align etc.
You can even get into even distributing things vertically and horizontally, it’s super helpful!
Tip 5: Rasterize
Let me hear it for the people in the back!!!
Ever find that your file loads really slowly when you have a bunch of images in it? Have you ever stopped to see what resolution each of those images is? If it’s bigger than 300dpi, I'd suggest you rasterize it. Doing this will not only help your file load way faster, but it will also cut down on the file size! 300dpi is the standard for printing and 72dpi is the standard for the web.
Make sure your image is selected, choose object>rasterize.
From there you can pick that DPI (resolution) that we were talking about!
Adobe Illustrator isn’t an overnight learn by any means, but helpful tips and tricks along the way can make the learning process go a lot smoother and quicker!
Help Someone. Have Fun, Be You. Learn & Teach. Finish What You Start.


